Pages

Monday, May 31, 2010

Tutorial: How to make your own doilies using corner punches


Happy Memorial day everyone, hope you had a safe, fun weekend!

I want to share a little tutorial with you all today. While browsing various blogs lately, I've seen a couple of crafters using small doilies from Martha Stewart in their paper projects. There was even a post about it on Splitcoast Stampers, and apparently they're hard to find in stores. Well, not too long ago I was experimenting with some new corner punches and had a lightbulb moment. Was it possible to make my own doilies with these corner punches? I set out to try. Sure enough, I had some success! I've only experimented with a few different kinds of punches, and some worked better than others. For example, this Layered Arch worked really well, while the Modern Garland wasn't the best looking in my opinion. The Quilted Corner worked really nicely, as well. 
Also, the size of the circle is really important too. For the Layered Arches, I used the Nestabilities small circle #1 and it worked out almost perfectly. I found that I could use the small circles with more success than the large. 
Here are a few pics that will illustrate how it's done. You can click on them to make them larger. 

Although the punches have these slide out tabs for easy alignment of corners, you can still slide your paper circle right over them without taking them apart like other corner punches. 
When lining the circle up along the edge of the circle, try to make sure the punch design is centered evenly. Be careful not to have it angled to the right or the left, instead, aim the center of the design towards the center of the circle. 

Each time you punch around the circle, make sure to line up the left side of the punch as close as you can to the previously punched design without actually overlapping. It takes some time, but I think the results are worth it! If you are careful, you will end up with a doily like the one pictured above, with small bit of paper still attached. Some corner punches don't come totally perfect, but it's close enough for government work, LOL! It's easy enough to snip these scraps off with small scissors, or a craft knife. 
That's it! Your own doily to coordinate with the edge punches! And you don't have to search high and low for the precut ones, because you can make different sizes on your own. 

So here's a finished card with one of the doilies:

        
Pretty, isn't it? Now dig out your corner punches and give it a try!

Thanks for stopping by!

Stamps: Stampavie
Ink: Memento
Paper: Heavenly White, Cosmo Cricket, Bazzill, PTI
Accessories: PTI twill ribbon, seam binding, Nestabilities, Martha Stewart punches, colored pencils, OMS

Friday, May 28, 2010

Sweet little you...


Almost everything on this card is digital. Except for the ribbon, button and the solid colors cardstock. I love being able to print out most of the elements that I need for a card idea! Let me tell you, if home printing was more economical, I would have a much larger stash of digital papers. My crafting storage space would be cut in half!
This is a sweet digi stamp from Mo's Digital Pencil. How adorable is this baby girl?! I colored her with Copics. The papers are from Tracy Ann's Digital Art. 


Well, I have a busy weekend coming up, gotta start cleaning the deck and grill for some serious barbeque-ing! We have some fishing to catch up on too, need to break in my new pink fishing pole. I'm not an avid fisher, but I love being out on the lake with my sweetie, who does love to fish. 


Have a great weekend everyone!


Digital stamp from Mo's Digital Pencil, papers from Tracy Ann Digital Art, Memory Box cardstock, Copics, pink polka dot ribbon, PTI button, sentiment stamp from Whipper Snapper, SU scallop punch.

Thursday, May 27, 2010

Count the waves...

I love nautical themed stamps. I especially love lighthouses, and have a little collection of them from various stamp companies. Impression Obsession started my collection, then Stamps Happen, and now this set of stamps from JustRite. I especially love this sentiment- If you want to know how much I love you... count the waves. My sweetheart and I have always played this corny little game where we have to describe how much we love the other. Something like- how much do I love you? Ohhhh, more than all the grains of sand on the entire planet earth. Or- More than all the stars in the entire universe. LOL. Yeah I know it's sappy, but it's  gotten to be a little contest between us, who can top the last one and it's fun. So this sentiment is going into my arsenal!
Anyway, I colored this beautiful beach scene with some Copics and used lots of blue and green papers from a Memory Box collection. I even added a little jute twine and brads to simulate nautical rope.

Thanks for stopping by, have a wonderful day!

Stamps: JustRite
Ink: Memento
Paper: Memory Box, Heavenly White, SU, Core'dinations
Accessories: Martha Stewart edge punch, jute, brads, Copics, Nestabilities, brown grosgrain ribbon

Tuesday, May 25, 2010

May PTI Blog Hop

It's time for Papertrey Ink's monthly blog hop, and since I had a card that fit the challenge, I've decided to play along! 
Here's my card:
When I first saw this adorable VW Bug stamp set, I really tried to convince myself I did NOT need it. But then I found some adorable digi papers from Tracy Ann Digital Art  Etsy shop and I immediately thought of a FLOWER POWER Bug! I've always wanted a lime green VW Bug, and if I didn't have kids to chauffeur around, I'd probably have one! Well, this is as good a substitute as I'm gonna get, lol! 
Here's a closer look:

I stamped the Bug onto some groovy flowered paper I printed out from the collection and cut it out. I applied some Liquid Glass to the windshield area instead of trying to color it to make it look like glass. I did add some shadowing with Grey Copics to give it some dimension though. 


I didn't have the right color PTI felt to match this card, and I really wanted a Lime green felt flower to embellish it so I dyed some of the Cream felt with shhh... food coloring. Yes, I've done this many times with wool felt, and I LOVE the way the colors come out! Also, when you boil wool felt (this is how I dye felt, on the stove in a pot of simmering food colored water), and then throw it in the dryer for a little while, it felts. I prefer the look of felted wool felt, it gets a gorgeous soft texture to it that is really beautiful. So, I made a little flower with it and topped it off with a button. 


Hope you like it as much as I do, and have fun blog hopping! Thanks for visiting!


Stamps: PTI
Ink: Memento
Paper: PTI, TADA digi papers, Memory Box
Accessories: PTI felt/button/ribbon, Martha Stewart edge punch, Liquid Glass, Stickles, Copics, Spellbinders flower dies/circle Nesties

Monday, May 24, 2010

Be still...

Good morning everyone! I'm still foggy headed, trying to clear the weekend cobwebs this Monday morning, coffee is not working fast enough, might have to insert an IV. LOL.

I've got a beauty of a card to share with you all, at least I think it is. I'm particularly fond of this color combo, one of  my faves as a matter of fact. I love blue-greens and greens together. The paper is SU's Green Tea and the colors are perfect!
I stamped the tree with Versamark and white embossed it. The using some sponge daubers, I added soft color all around it with Baja Breeze and Celery. 
I was going to add a sentiment, but thought this would be better as one of those all purpose cards. It seems whenever I need a card I go through my stash and find one that works only to discover the sentiment is wrong for the occasion. I don't know why this happens to me all the time , but it's very frustrating. So, I may have to leave a bunch of cards blank from now on. 


Sorry if this post doesn't make much sense, I really am incredibly sleepy this AM, LOL! Thanks for stopping by, be back soon!


Stamps: SU
Ink: Versamark, SU
Paper: SU, PTI
Accessories: Nestabilities, Spellbinders fancy tags, Fiskars edge punch, SU ribbon, daubers, White EP

Thursday, May 20, 2010

Impression Obsession Friendship card challenge

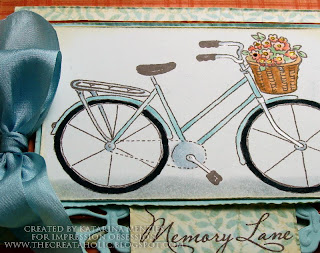
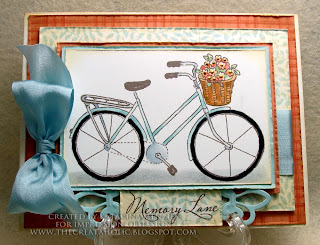
It's time for another Impression Obsession Challenge. The challenge this week is to create a Friendship card, then mail it to your best friend. Well, once I start thinking about a best friend, a lot of memories come to mind, from childhood especially, those seem the sweetest memories. So this nostalgic card is what I came up with. 

I've used a lot of stamps for this card, the main image, and the background papers are all stamped. For the Melon colored DP I used this Triple Stripe stamp to create a plaid pattern. The leaf patterned paper was stamped with one of my favorite Cover a Card stamps, Greenery, in Soft Sky ink. 

The bicycle is from the Riding Pretty clear stamp set, which I colored with some Copics. I've aged all the papers slightly with a bit of Distress Ink, Antique Linen. I love the soft vintage look it gives to my projects.

You can play along in our challenge too, and win some IO bucks for the Impression Obsession store! Read all the details on the IO blog. Then you can check out all the other friendship cards created by our design team ladies for more inspiration!


Thanks for stopping by!
Stamps: Impression Obsession
Ink: Memento, Distress
Paper: Heavenly White, SU, PTI
Accessories: Silk ribbon, Copics, Adirondack Dimensional paint, Spellbinders pendant die, Sakura glaze pen

Wednesday, May 19, 2010

Pink Daffodils? In my world they are!

If it were up to me there would be pink daffodils, LOL. I've seen orange and peach ones, but not pink. Which is why I got really imaginative with this card! 

I stamped the daffodil image from Papertrey's Year of Flowers set three times on watercolor paper, and embossed it with white. Then it was just a matter of simple wet water coloring with Adirondack reinkers. I cut them out and popped them up with foam tape.

The card front was stamped with PTI's guide lines 2 set, in Hibiscus, Lemon and Spring Moss. No store bought DP at all on this card! 
This card is off to my mother for her birthday tomorrow, I hope she likes it!

Thanks for swinging by!

All supplies from Papertrey Ink except Versamark and white embossing powder (Ranger). 

Monday, May 17, 2010

May Blog Waltz with Waltzingmouse Stamps

I'm happy I can finally join in for Claire's blog waltz this time! Timing was just not right till now, but I got my card and project done with plenty of time to spare. I love WM stamps, the designs are just incredible, and get better and better with each new release!

When I first saw this tea set I have never made a decision to buy something quite as fast, lol! Although I have a few tea sets already, I had to have it! It's nostalgic charm just cooed sweetly "Buy me Buy me..."
This is what I came up with. A pretty little easel card, one of my new fave cards to make, and the fantastic rubber band box from WMS templates. This little box is perfect for a couple of tea bags to accompany the card. I love it, I can see using it for all sorts of little gifts. AND, it's super simple to put together.
Since I'm so infatuated with October Afternoon's Thrift Shop paper collection lately, I paper pieced the little tea pot and cup for the card. Except for some Copic shading around the pot and cup, there is no coloring.

Now I'm off to browse some of the other blog participants, I'm prepared to be dazzled! Thanks for waltzing by....

Stamps: Waltzingmouse
Ink: Memento, Distress, Perfect Match
Paper: Core'dinations, Bazzill, October Afternoon
Accessories: Fiskars Apron Lace punch, gingham taffeta ribbon, Scor Pal

Saturday, May 15, 2010

Fly Away!

I don't usually like these kinds of stamps, but when I saw PTI's mini set Fly Away, and that adorable Beetle from last month's release, I HAD to have them! Then I had to wait for them to get back in stock. Finally, Fly Away was in, BUT Enjoy the Ride was still out! Grrr... So I wait some more. Finally, both are in stock! But wait--woodgrain impression plate is out! AHHH!!! Let me tell you, it is now officially a hair raising experience to shop at PTI. I really hope they adjust to these growing pains SOON!
Anyway, I still don't have the woodgrain impression plate, but that's on this month's order, which I placed at 12:07 AM on the DOT! I wasn't missing out again.

I colored the little plane in Ocean Tides trio Copics, and the red is a sparkly Spica pen. I did the custom ribbon thing with Copics too, although it bled a bit on the white twill. I'll have to try it different ribbons, one that doesn't bleed.

Well, I'm glad the PTI release night is over, it was quite the ordeal, hope your hair didn't turn white in the process! Thanks for stopping in!

All supplies from PTI and Spellbinders (Nestabilities)

Friday, May 14, 2010

PTI Florals set of cards

I first tried this technique for coloring in white embossed flowers with sponge daubers and inks and fell in love with it! I've seen it done with a lot of cards in the SCS gallery, and always wanted to try it. Well, once I did I couldn't stop. Before I knew it, I had this series of cards. First in pink and green, one of my favorite color combos. I used Adirondack inks to sponge the color in, and cut it all out. I love the softly blended colors the daubers create.

Here's one in Plum Pudding:
I stamped the leaves from Turning a New Leaf all over some Plum card stock, but the color was bit too vibrant, so I toned it down by applying a wash of acrylic paint over it. It resisted the Hybrid ink to create this pretty watermark effect. The flower was colored with Ranger Distress inks.

And here's another card in Summer Sun:
Again, the orange was a bit too bright, so after stamping a background design I applied a wash of white acrylic paint over it. I think I'll box these cards up as a set in one of PTI recycled clear stamp boxes, and embellish it with some pretty stuff. This technique is a keeper!

Thanks for looking, Happy Friday!

Stamps: PTI
Ink: Adirondack, Distress, Versamark
Paper: PTI
Accessories: Martha Stewart edge punches, Nestabilities, Scor Pal, white embossing powder, sponge daubers, Stickles, PTI ribbon, pink taffeta ribbon


Tuesday, May 11, 2010

Vaa-roooom!

I love this image because it's so unusual. Who would've thought that the backside of a little girl on a tricycle would be adorable? I certainly didn't, but Mo did, and that's why she's so amazing.
I wanted a funky, bold and bright color scheme for this card, so I went about stamping my own DP again. Blue-green, red and black is what I came up with using one of PTI's background sets.
I kept thinking about my own kids when they were on tricycles, scooting around making va-rooom noises, so I printed that out on some card stock and made a little strip to attach to the side of the card. This little gal is on a mission! She's got to get her BFF's house pronto so they can play Barbie! LOL.

Hope you like it, thanks for looking!

Stamps: Digi stamp from Mo's Digital Pencil, PTI
Ink: PTI, Memento
Paper: PTI
Accessories: Martha Stewart edge punch, PTI ribbon, colored pencils, OMS, Spica pens

Sunday, May 9, 2010

The depth of your love...

Happy Mother's Day! I'm having a windy, COLD day unfortunately, but oh well, the sun is still shining.
Here's the 'Card' I made for my Mom. Hopefully she got it already, so I won't be spoiling the surprise.
I put card in quotes, because it's not really a card-card. The image I colored was waaaaay too pretty to crop, I had to use the whole thing, so it ended up being very LARGE with the sentiment, DP's, etc. I never mounted the entire thing to a card base at all, instead, I decorated the back, too, with a cream colored die cut so I could write a little message for her. I figured she could hang it on the wall, so I attached a bit of ribbon to the top as a hanger.
I've been after this Stampin Up set 'Riot of Petals' for a long, long time. It goes for ridiculously high price on Ebay, but I finally scored one for less money on the Splitcoast selling forum.

I stamped/embossed the image onto sturdy water color paper, then water colored the entire thing with Distress inks. I love the way this came out!
The sentiments are from Papertrey's Mother set.

Gotta run, we're off to NJ to visit my Mom! Enjoy your day Mothers!

Stamps: Stampin Up, Papertrey Ink
Ink: Memento, Versamark, Perfect Match, Distress
Paper: Fabriano water color paper, K & Co., SU
Accessories: Martha Stewart corner punch, Stickles, seam binding, eyelets

Saturday, May 8, 2010

Love you muchly

I've been seeing some awesome cards done this way, the easel card, but thought it would be too complicated for every day card making. Well, I was wrong, and I am hooked! I really love this style of card because you can decorate the inside of the card and it will still be partially visible while it's on display. I am so slow to try new things, this tutorial was featured on Splitcoast a while ago, and I never bothered to try it!

I used some new papers from October Afternoon's Thrift Shop collection. What an awesome, nostalgic collection of papers! Not sure if I'll ever use the London map, or sewing pattern papers, but the rest of the set is so pretty.

Well, I'm off-- I'm on a card making ROLL and don't want to interrupt it for too long. I have to take advantage of it while it's here, because it seems if I neglect it for too long, the mojo goes on hiatus, LOL!

Thanks for stopping by!

Stamps: My Favorite Things
Ink: Memento, Distress
Paper: SU, October Afternoon, Bristol Vellum
Accessories: Fiskars Apron Lace punch, Nestabilities, Scor pal, sewing machine, Twill ribbon, colored pencils, OMS
Friday, May 7, 2010

My Angel...

Here's another card made with a Day for Daisies angel digi stamp. LOVE them! Perfect for little girls, and this card is so girly girl it makes my teeth ache, lol! I colored her in with some colored pencils in pretty, soft pastel colors. Lots of Star Dust Stickles for her wings. I decided to cut her out completely (and I forgot to add the halo, darn!) so I could use this pretty bird background paper from Memory Box.
I couldn't decide on a DP for the card front, so I just stamped some little polka dots in matching colors. I printed the 'You're my angel' sentiment from my computer and added a little ribbon tag to the bow. I would've loved this card as a little girl. Pink was my favorite color in the whole wide world and taffeta bows were the BEST.

Thanks for looking, come back soon!

Stamps: Digi stamp from A Day for Daisies
Paper: PTI, Memory Box
Accessories: Spellbinders Labels 10, Nestabilities, colored pencils, OMS, Copics (for skin), Stickles, Taffeta ribbon, Prima flower, brad, MM ribbon slot punch

Wednesday, May 5, 2010

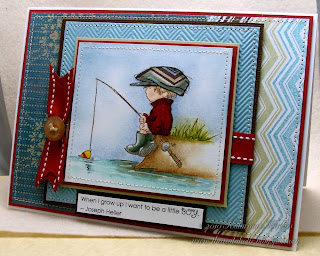
When I Grow Up...

Thank you so much for all the fabulous suggestions for sentiments for my previous card! I love all of them and have saved them for future use. I always have a Word document with all the quotes and sentiments I love found in my internet travels, and have added them to my collection. I should've thought about asking all of you for suggestions, with so many clever thinkers out there!

I love the image of this little boy fishing, such a sweet, peaceful scene. The little boy's clothes immediately made me think of tweed, hounds tooth, herringbone, etc. So I used a lot of textures and patterns for this card. I used the textural background patterns from several Waltzingmouse Stamps sets, Faux Fun for the little guy's sweater and Offbeat Backgrounds for the zig-zag striped hat and BG paper. The hat and sweater were paper pieced.
Then of course I had to use my Herringbone embossing folder to tie in with the theme, some stitching around the layers and stitched ribbon. I love the different 'fabric' textures! I was browsing for an appropriate sentiment and came across this quote, which I thought was absolutely darling, so I printed it out and used it on the card. Even though it's a little boy card, I can think of a few grown 'little boys' that this card would be perfect for!

Thanks again for your input, and have a great day!

Stamps: Lili of the Valley, Waltzingmouse Stamps
Ink: Memento, Distress, SU
Paper: PTI, Coredinations, SU, Bristol vellum
Accessories: Cuttlebug EF, PTI ribbon/button/twine, colored pencils, OMS, Copics

Tuesday, May 4, 2010

I can cry if I want to!

MJM's drawings are probably my most favorite images to color lately, but I have one problem with some of them... I can't come up with appropriate sentiments for them. This cutie is a perfect example. What in the world could I put on the card as a sentiment?! What occasion could this card be used for? I have no idea, but I don't care one bit. It's CUTE and it makes me HAPPY! That's all that matters. LOL.
I've colored little Jill with Copics. The paper is from a DCWV mat stack.
Thanks for stopping by, see you all again soon I hope!

Stamps: Digital image from Digital Pencil Too
Paper: Neenah, DCWV, Memory Box, PTI
Accessories: Martha Stewart simple scallop edge punch, PTI ribbon/button, Copics, wool felt, PTI flowers dies

This Sunday is Mother's Day!

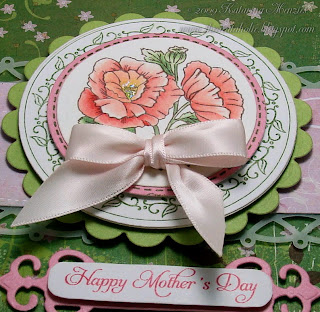
This is the Mother's Day card my sweetheart chose for his Mom. I took a picture of it quickly before he sends it out. He always begs me to fill out his cards for him, claiming his handwriting stinks, but I refuse! A card is not personal unless it's filled out personally! I'm sure his mother won't care about his chicken scratch, lol!
I used this gorgeous wild rose stamp from the Just Rite stamp collection for the focal point, colored with some Copics. I stamped the flowers and borders on separate pieces of paper so I could cut them out with my Nesties individually and layer them. I love the medallion effect it creates.
I used some coordinating papers from Memory Box, I LOVE LOVE LOVE that they have matching solid color cardstock to go with their patterned papers. I wish ALL companies did this! I spend more time trying to find matching colors of Bazzill to go with my fave patterned papers that it ends up taking me soooo much longer to make cards than it really should! Maybe if they kept their Matchmaker site updated more often, I'd be able to use that as a resource and save time. But, they don't, so I really like using Memory Box, PTI and SU.

Well, I've got to get this card ready for mailing, and I better take pics of my Mom's 'card' so I can share it with you. But it'll have to wait till after Sunday, because I suspect she might check my blog every now and again...

Thanks for stopping by!

Stamps: Just Rite, PTI
Ink: Memento, Perfect Match
Paper: Heavenly White, Memory Box, vellum
Accessories: Martha Stewart Quilted edge punch, Nestabilities, Fancy Tags, Copics, Stickles, pink satin ribbon

Sunday, May 2, 2010

Garden Fairy

I colored another one of Mo's beautiful digital fairy images. This time I used a shimmery paper to print on, and I quickly embossed it right out of the printer. It's a really beautiful effect, just like a real stamp! Since I couldn't use my colored pencils on this paper, I colored it with Copics. And let me tell you I love the way Copics work on this paper! It's a bit different from regular paper because it doesn't require as much blending. BUT, the result is a lot different too. If you click on the pictures you can see what I mean. It's more of a water color-y and textured look because the Copics 'push' the previously laid down color a little rather than blend totally into each other. It's kind of hard to describe, but it's a fun experiment to try something new.
I really love the look of it though, and since embossing printed images is easiest on shimmery paper, I suspect I'll be using this technique quite a bit.
The paper is from the new Memory Box 'Enchanted' collection (perfect for a magical fairy).

Hope you like it, thanks for dropping by!

Stamps: Digi from Mo's Digital Pencil
Paper: Shimmer paper, Memory Box
Accessories: Martha Stewart edge punch, twill ribbon, Copics, Stickles

Saturday, May 1, 2010

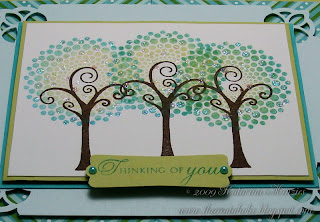
Mod Trees

While I was happily stamping away making backgrounds with PTI's Dot Spot set, there was always a tiny part of my mind thinking what awesome trees these stamps would make. I searched and searched through my many stamp sets trying to come up with a workable idea. Finally, in the deep dark corners of some of my very much unused sets, I rediscovered this tree stamp from an old Inque Boutique stamp collection. I have no idea if it's even made anymore, I think the company was bought by someone else. But it was perfect for what I had in mind.
I simply stamped the circular dot pattern in two colors of ink, then added the trunks. I love the effect!
I've also been wanting to create a zig zag pattern with the striped paper from PTI's Green Boutique collection, and set about trying it. It took a couple of tries, but this is what I came up with. I cut the patterned paper into strips, then alternated and flipped each one into this zig zag pattern. Sweet!
I love the way this card came out, which doesn't always happen when I'm trying new things! You should try it, it's a lot of fun when you hit on something that works!

Thanks for looking!

Stamps: Papertrey Ink, Inque Boutique
Ink: Perfect Match, Vivid
Paper: PTI, Memory Box
Accessories: Martha Stewart corner punch, PTI ribbon, SU Modern Label punch, pearls, Stickles